

How to Choose Snack Containers for Easy Maintenance in 2026
To choose snack containers for easy maintenance in 2026, prioritize materials with clear food-contact disclosures like 18/8 stainless steel, borosilicate glass, or platinum silicone. Avoid vague plastics and decorated ceramics that may harbor unknown chemicals. Select stainless steel for dry, portable snacks and glass for home storage where visibility aids cleaning. Use well-disclosed silicone for leakproof needs. Always verify care instructions match your cleaning habits, ensuring the container withstands your routine without degrading or requiring complex disassembly.
Quick Answer
Choose snack containers with clear material disclosures to simplify maintenance. Stainless steel and plain glass are preferred for easy cleaning and durability, while silicone offers flexibility for leakproof needs. Avoid vague plastics and decorated wares that complicate care. Prioritize containers that withstand regular washing without degrading, ensuring a simpler, lower-maintenance system for daily use. Always consult your specific model’s manual for detailed care instructions.
Table of Contents
- Quick Answer
- Our Top Picks
- Choosing Materials for Easy Cleaning and Safety
- Matching Container Types to Snack Categories
- Establishing a Routine for Container Maintenance
- Inspecting Containers for Wear and Seal Integrity
- Selecting Cleaners and Sanitizers for Different Materials
- Preparing Snacks That Fit Easily into Maintained Containers
- Frequently Asked Questions
- Sources
Our Top Picks
Affiliate disclosure: if you buy through these links, we may earn a commission at no extra cost to you.


Choosing Materials for Easy Cleaning and Safety
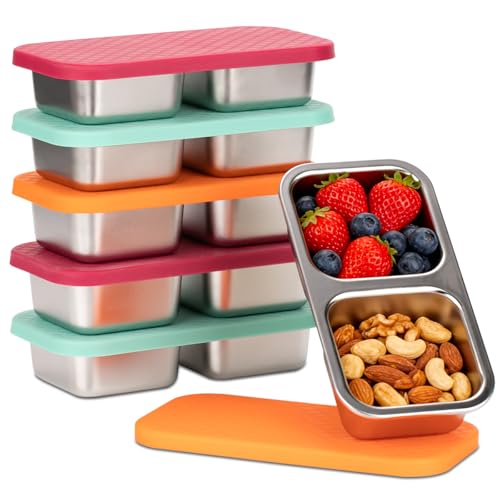
When selecting materials for easy cleaning and safety, prioritize options with clear material disclosures and lower chemical mystery. Stainless steel serves as a robust choice for everyday packed snacks, offering a hard surface that is generally resistant to messes. However, note that poorer-quality steel combined with acidic foods may pose migration risks, particularly for those with nickel sensitivities. For flexible, leakproof needs, silicone provides utility for portable messy foods and freezer prep. Research indicates that siloxanes can migrate from silicone under hotter or fattier conditions, though this tendency often decreases with repeated use. Silicone is not necessarily superior to plain glass for repeated hot, oily, or high-heat applications. Plain glass is ideal for home storage, wet foods, and leftovers where visibility is beneficial. Its primary considerations involve weight and breakability, requiring users to stick with food-safe glass from brands providing clear material information. Avoid relying on labels like "BPA-free" as complete safety guarantees, as substitutes such as BPS and BPF may also leach into food. Children may be more vulnerable to food-contact chemical exposures due to their size and eating patterns. Consequently, avoiding microwaving food in plastic and minimizing daily contact with plastics aligns with safety guidance. Choose materials that reduce daily compromises while maintaining ease of maintenance through proper cleaning protocols defined in your specific model manuals.
Matching Container Types to Snack Categories
Selecting the appropriate container involves aligning material properties with the specific nature of the snack being stored. For dry, grab-and-go items such as crackers or loose snacks, stainless steel containers are a suitable choice. These rigid vessels provide structure for portioning sides or maintaining separate compartments for different food types. When dealing with wet snacks, dips, or yogurt, containers featuring silicone lids or made entirely of flexible platinum silicone are recommended. The silicone components help create leakproof seals necessary for holding moist foods without spilling. Glass containers are primarily indicated for home use or fridge storage where visibility of the contents is desired. These rigid glass options work well for general home snacks. Flexible silicone bags serve as leakproof solutions for easy snacking, particularly for younger users who may need pliable packaging. The distinction between materials relies on the snack's texture and moisture level. Dry items pair best with rigid metal options, while wet or semi-liquid foods require the sealing capabilities of silicone or specialized pod designs. Portioning needs also influence selection, with nesting sets offering organized storage for lunchbox sides. Ultimately, the match depends on whether the snack requires a rigid structure, a flexible leakproof environment, or transparent visibility for home storage.
Establishing a Routine for Container Maintenance
Establishing a routine for container maintenance involves organizing tasks into daily, weekly, and quarterly intervals to ensure sanitary conditions and prevent residue or mold growth. Daily procedures require rinsing and washing containers with hot, food-safe detergent followed by air-drying. During this daily step, inspect containers for physical damage such as cracks or dents. Weekly maintenance focuses on disassembling lids, seals, and gaskets to thoroughly clean these components, followed by sanitizing with an approved food-contact sanitizer. Quarterly tasks involve deep cleaning hard-to-reach areas, replacing damaged containers or lids, and verifying first-in, first-out inventory practices to manage aged stock. To implement this schedule effectively, log each action with the date, responsible person, and any corrective actions taken to maintain traceability. Standardize terminology like sanitize and air-dry for clarity among staff. Budget considerations should define the frequency of replacements, approved sanitizers, and labor allocation to keep the schedule practical. When cleaning, sort containers by material and function to match appropriate detergents and sanitizers. Pre-rinse with warm water, wash at recommended temperatures specific to the material, rinse thoroughly to remove soap, and sanitize using a food-grade solution for the manufacturer’s specified contact time. Finally, air-dry containers inverted and store them with lids off to prevent moisture accumulation.
Inspecting Containers for Wear and Seal Integrity
Before using any food container, conduct a thorough inspection to identify damage, contamination, or seal failures that could compromise safety. Begin with a visual examination of both the container body and the lid. Look closely for cracks, dents, warping, or deep gouges, particularly along rims and corners where seals are critical. These physical defects can harbor microbes or prevent lids from mating evenly, leading to cross-contact issues. Examine the gaskets and lid materials for signs of wear, such as tears, stiffness, or missing sections. Stiff material or label transfer may indicate contamination or material failure. Scan seams and labeled areas for any stains or mold growth, which signal potential hygiene issues. Verify that containers nest and stack correctly, ensuring lids snap flush against the rims without gaps. A manual seal test helps confirm integrity. Gently attempt to create a vacuum seal to check if the lid holds properly. If any defect is discovered during these visual or manual checks, the item should be immediately removed from service. Tag it for repair or replacement according to established maintenance protocols. Only return containers to use after they have successfully passed both visual inspections and manual seal verification tests. This routine ensures that only sound, intact containers are used for food storage.
Selecting Cleaners and Sanitizers for Different Materials
Selecting appropriate cleaners and sanitizers begins with evaluating container material compatibility to prevent damage or residue transfer. For specific materials, choose products explicitly labeled for food-contact surfaces and approved for that substance, such as mild detergents for polycarbonate or GI-approved sanitizers for stainless steel. This step ensures the cleaning agent does not corrode the container or leave harmful residues. When employing heat-based sanitation, use hot water targeting temperatures of 75°C (167°F) or higher. It is critical that the container reaches and maintains this temperature for the recommended dwell time to be effective. For chemical sanitizing, strictly follow manufacturer and label instructions regarding contact times. Quaternary ammonium compounds typically require a contact time of 60 seconds, while hypochlorite solutions generally need about one minute to achieve the labeled microbial reduction. After applying any chemical sanitizer, rinse the container thoroughly with potable water. Allow the container to air-dry or use a clean drying method to avoid recontamination. To maintain consistency and compliance, regularly verify sanitizer concentrations using test strips. Document key parameters, including water temperatures, contact times, and sanitizer concentrations, in a cleaning log. This documentation helps ensure that cleaning protocols are followed correctly and provides traceability for food safety standards. Always prioritize the specific recommendations provided by the container manufacturer and the sanitizer label.
Preparing Snacks That Fit Easily into Maintained Containers
Preparing snacks that fit easily into maintained containers involves selecting appropriate portion sizes and formats that align with standard container dimensions. When considering snack types such as dips, spiced nuts, or small sandwiches, one should evaluate the physical volume and consistency of the food item. Items with loose components, like spiced nuts, may require containers with secure lids to prevent spillage during transport or storage. Conversely, semi-liquid items like dips benefit from containers with deep bases to minimize leakage risks. The preparation process should prioritize uniformity in snack sizing to ensure they nest or stack efficiently within the chosen vessel. This approach maximizes space utilization and simplifies the maintenance routine, as fewer irregular shapes reduce the likelihood of food residue trapping in hard-to-reach corners. When assembling snacks for container storage, it is advisable to allow adequate headspace to accommodate slight expansions or shifts in contents without compromising the seal integrity. Maintaining these containers requires regular inspection for wear, particularly around sealing mechanisms, to ensure they remain effective over time. Choosing materials that resist staining and odor absorption supports long-term usability. By aligning snack preparation techniques with the structural capabilities of the containers, users can facilitate easier cleaning and preserve the condition of their storage vessels. This methodical approach helps maintain hygiene standards while keeping snacks accessible and organized.
Frequently Asked Questions
How does using stainless steel or glass instead of plastic affect the ease of keeping snack containers safe?
Using stainless steel or glass reduces material mystery and avoids daily food-contact plastics. Stainless steel offers a hard, clean option for packed snacks, while glass provides visibility for home storage. Both materials lower concerns about chemical migration found in vague plastics, though stainless steel requires caution with acidic foods and glass needs care against breakability.
What is the recommended frequency for disassembling and sanitizing lids and gaskets?
Lids, seals, and gaskets are recommended for weekly disassembly and thorough cleaning. After disassembly, these components should be sanitized using an approved food-contact sanitizer. This routine helps prevent the accumulation of residue, mold, or cross-contamination within the container assembly.
How should cleaning temperatures differ between plastic and glass or metal containers?
Clean plastic containers at 110–120°F (43–49°C), while glass and metal containers require lower temperatures of 100–110°F (38–43°C). These specific temperature targets help maintain material integrity during the washing process. Always follow manufacturer guidelines for your specific container types to ensure safe and effective cleaning.
What visual signs indicate a container or lid needs to be replaced or repaired?
Visual signs indicating a container or lid requires repair or replacement include cracks, dents, warping, or deep gouges that compromise seals. Look for missing gasket sections, tears, stiffness, or mold stains on corners and seams. If lids do not snap flush or stack properly, these defects signal the item should be removed from service.
Which snack types from the provided recipes are well-suited for storage in divided stainless steel containers?
Snack types like savory cracker mixes, nut blends, and trail mixes are well-suited for divided stainless steel containers. Their dry, separate components benefit from compartmentalized storage to maintain texture and prevent flavor mixing. These items remain distinct when stored in sections, preserving their individual qualities until consumption.
Select containers with clear material disclosures like 18/8 stainless steel or plain glass to simplify cleaning and avoid mystery plastics. Prioritize undecorated glass for home use and stainless steel for packed snacks. Check care instructions for dishwasher safety and heat limits, referring to your specific model manual for disassembly or electrical safety details if needed.


